Configuring an External Keycloak
SEAL Systems products use Keycloak as standard identity provider. Keycloak contains various client configurations for PLOSSYS Output Engine and SEAL Operator.
If you prefer to use an external Keycloak, you have to configure your external Keycloak for working with SEAL Systems products.
Preparation
-
Install Keycloak.
-
Get a private key/certificate pair from your system administration.
Adding the SEAL Realm
-
In your Web browser, open the
Keycloak Administration Console. -
Log on with your user name and password.
-
Open the
Manage realmsmenu on the left.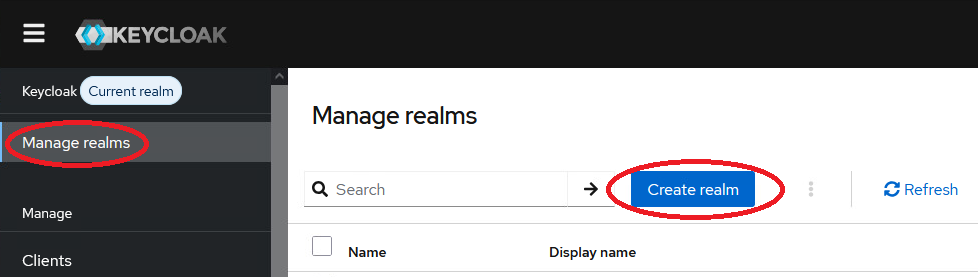
-
Open the
Create realmdialog. -
In the
Create realmdialog, enterSEALas realm name and confirm withCreate.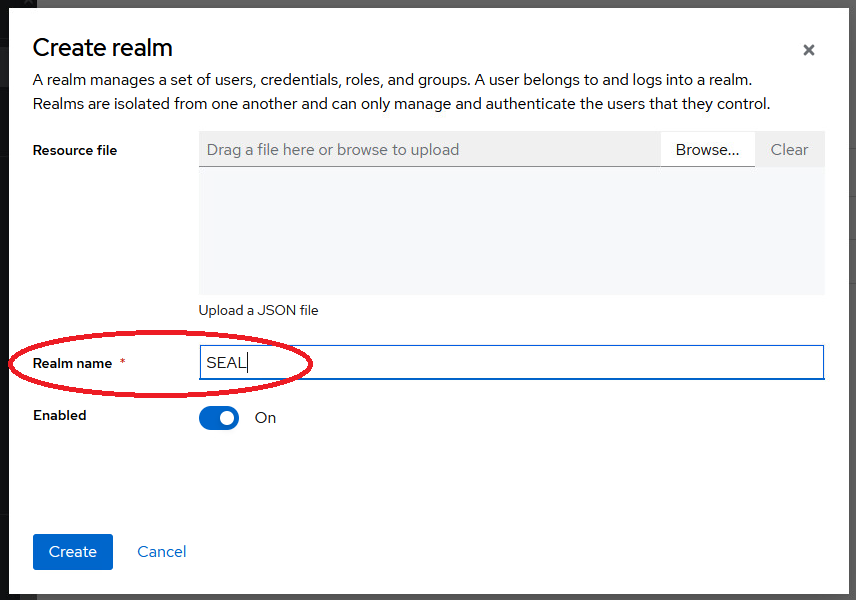
Adding a Key/Certificate Pair
-
In the list, select the
SEALrealm. -
In the
Realm settingsmenu on the left, select theKeystab and then theAdd providerstab.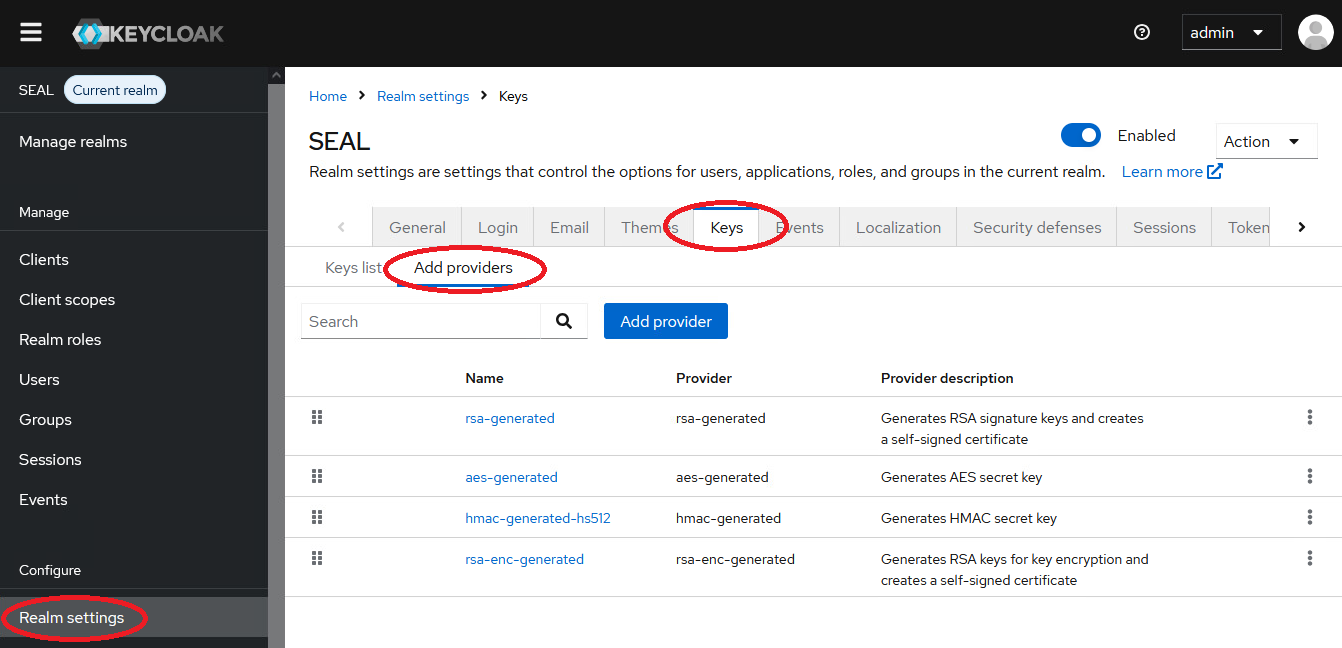
-
Open the
Add providerdialog and selectrsaas keystore type. -
In the new dialog, add the new key/certificate pair by entering the required data:
-
add the name of the provider
-
select a priority higher than 100
-
upload both, key and certificate file.
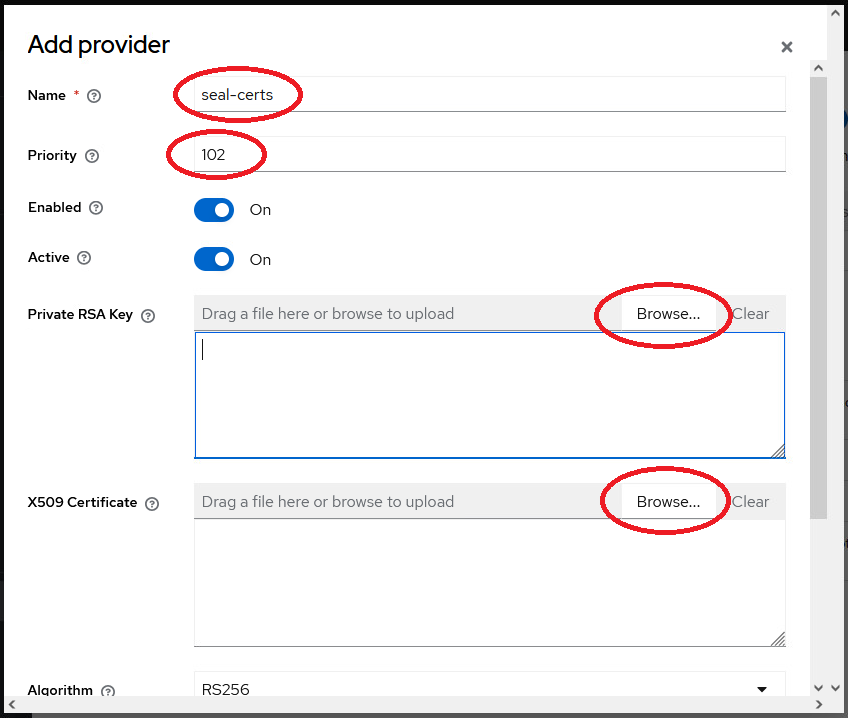
-
-
Save the settings.
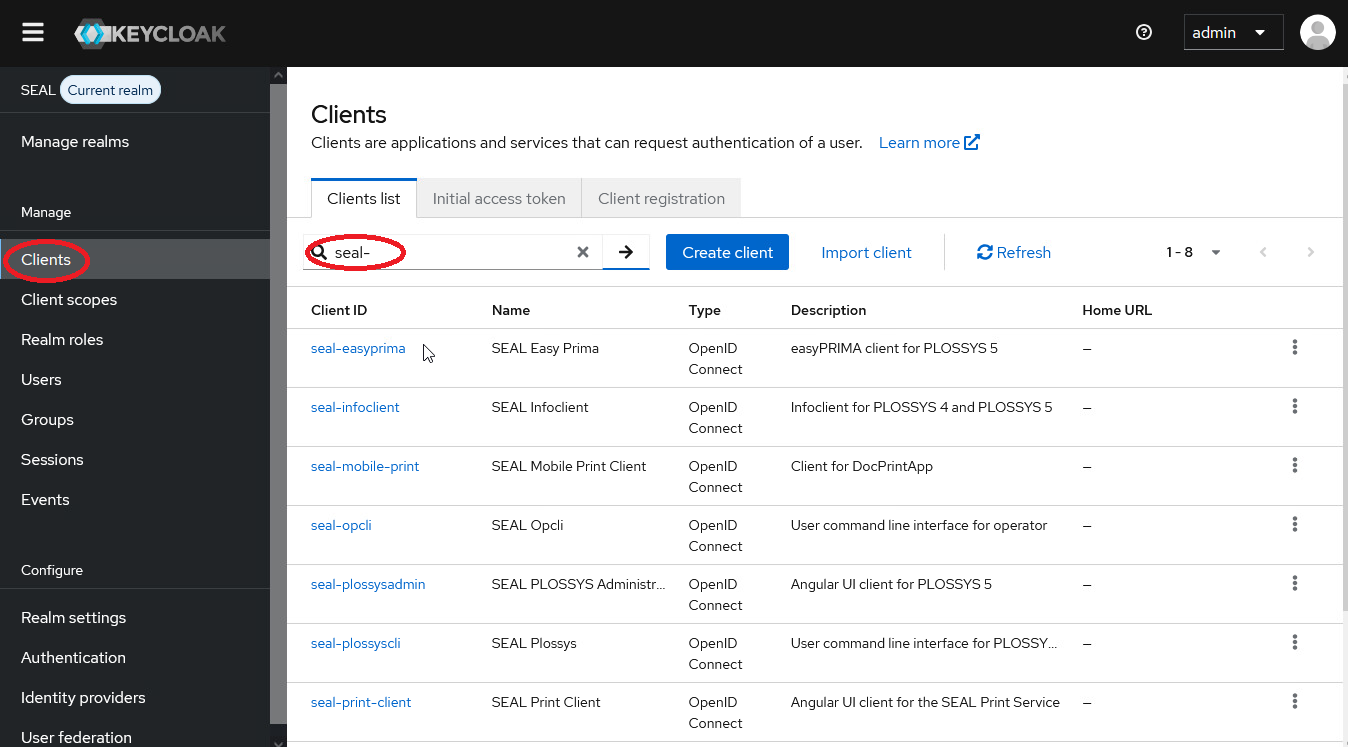
Adding SEAL Clients
The following detailed instructions use easyPRIMA as example.
Add other clients in the same way. You will find tables with the necessary settings susequent to the detailed description.
Finally your client list is supposed to look like this:
easyPRIMA Client
-
Select the
Clientsmenu on the left and clickCreate client.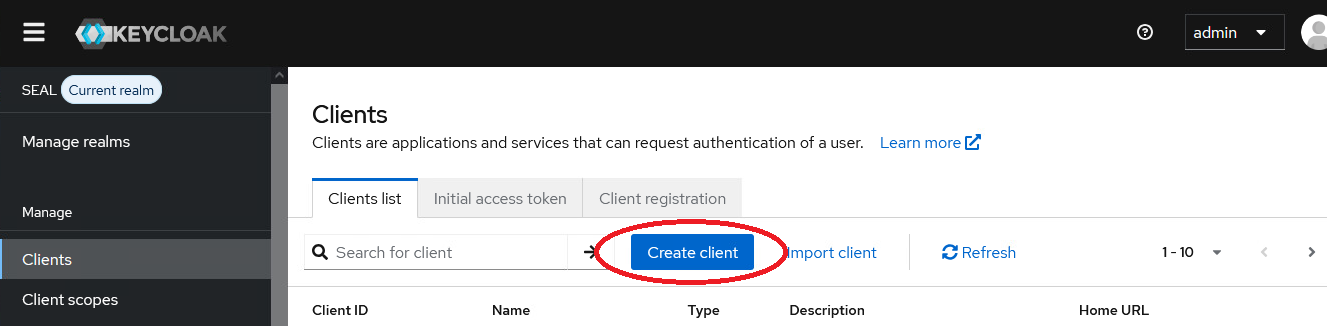
-
In the dialog, enter the
General settings.General Settings Client Type OpenID Connect Client ID seal-easyprima Name easyPRIMA Description easyPRIMA client for PLOSSYS Output Engine Always display in UI OFF 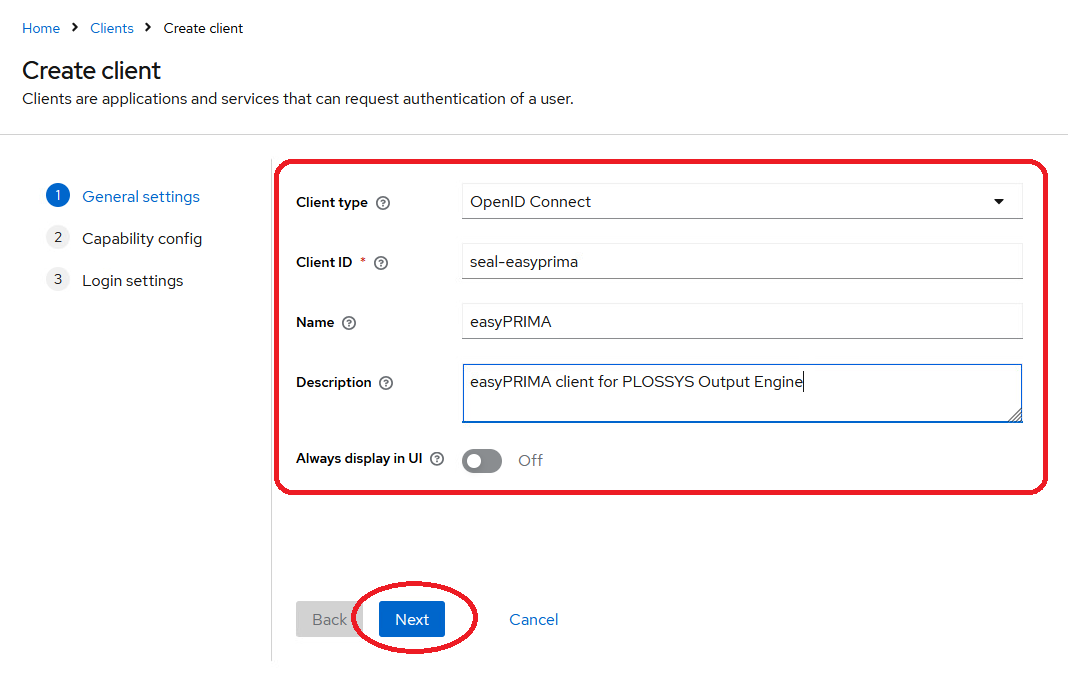
-
Click
Next. -
In the dialog, enter the
Capability configsettings.Capability config Client authentication ON Authorization OFF Authentication flow: ✔ Standard flow ✔ Direct access grants 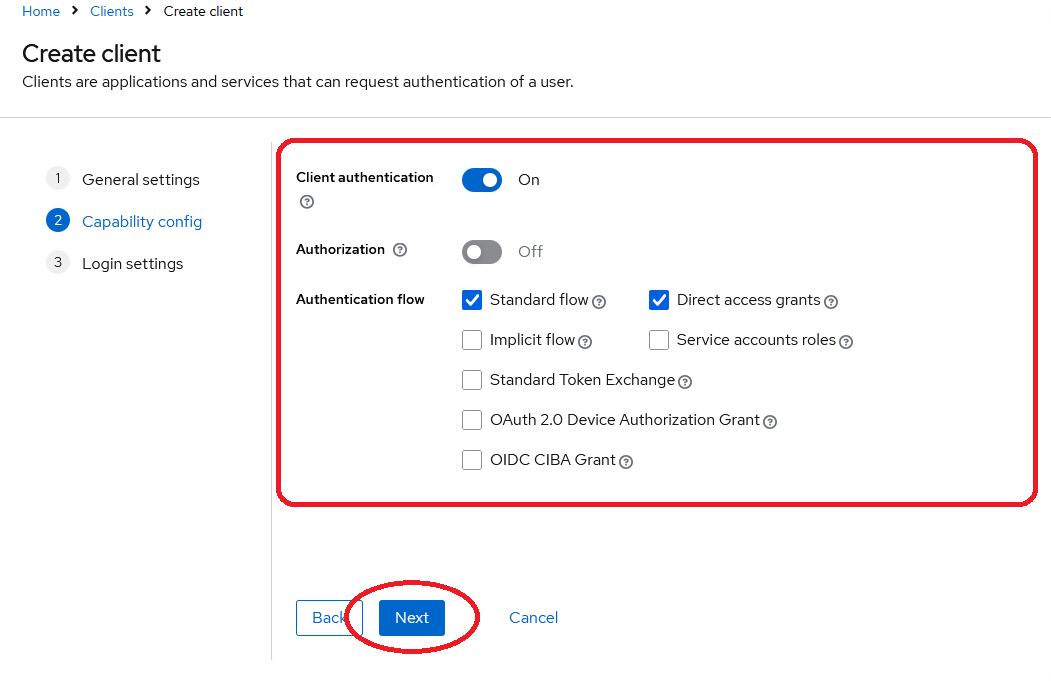
-
Click
Next. -
In the dialog, enter the
Access settings.Access Settings Root URL --- Home URL --- Valid redirect URIs https://localhost:9126/* https://localhost:9125/* Valid post logout redirect URIs --- Web Origins --- 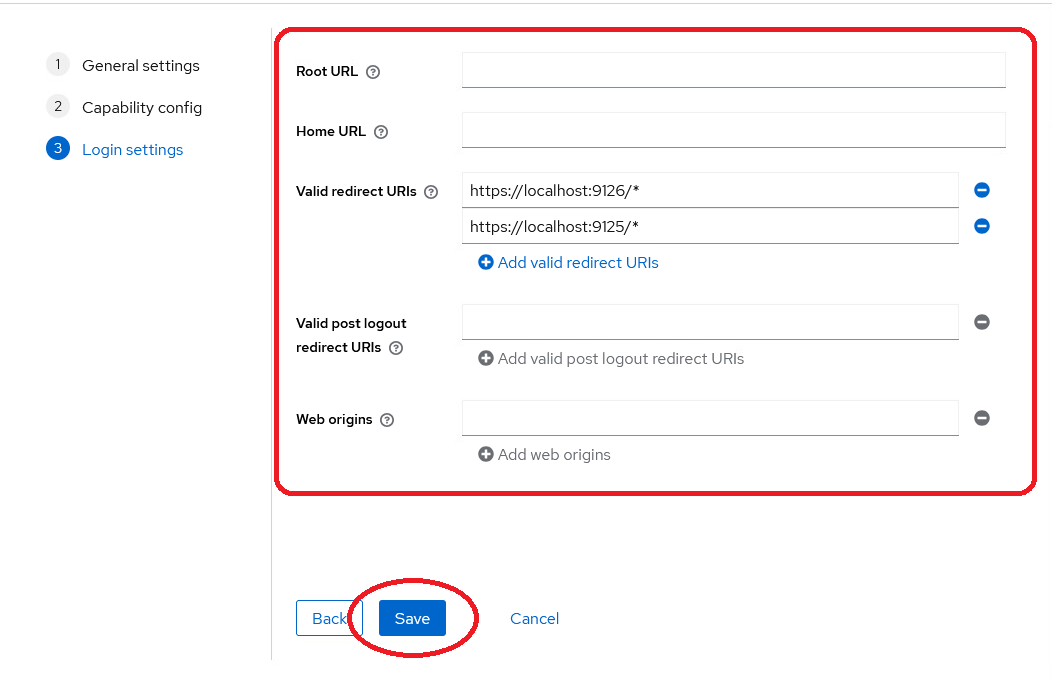
-
Click
Save. -
In the dialog, check the settings, and enter the
Login settingsin the corresponding section of the list.Login Settings Login Theme --- Consent Required OFF Display client on screen OFF Consent screen text --- 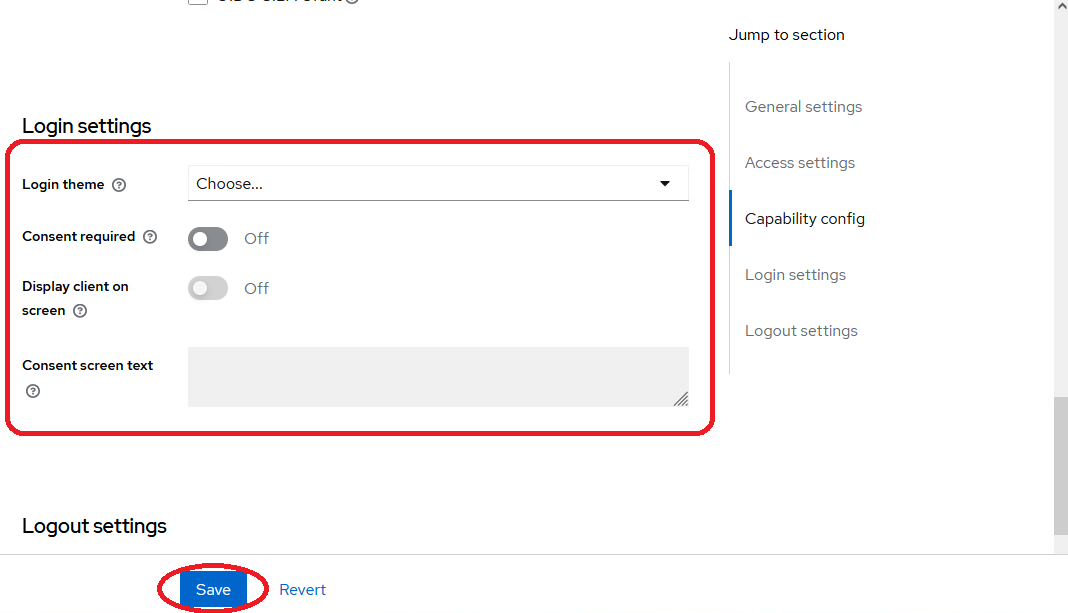
-
Enter the
Logout settingsat the bottom of the list.Logout Settings Front channel logout OFF Backchannel logout URL --- Backchannel logout session required ON Backchannel logout revoke offline sessions OFF 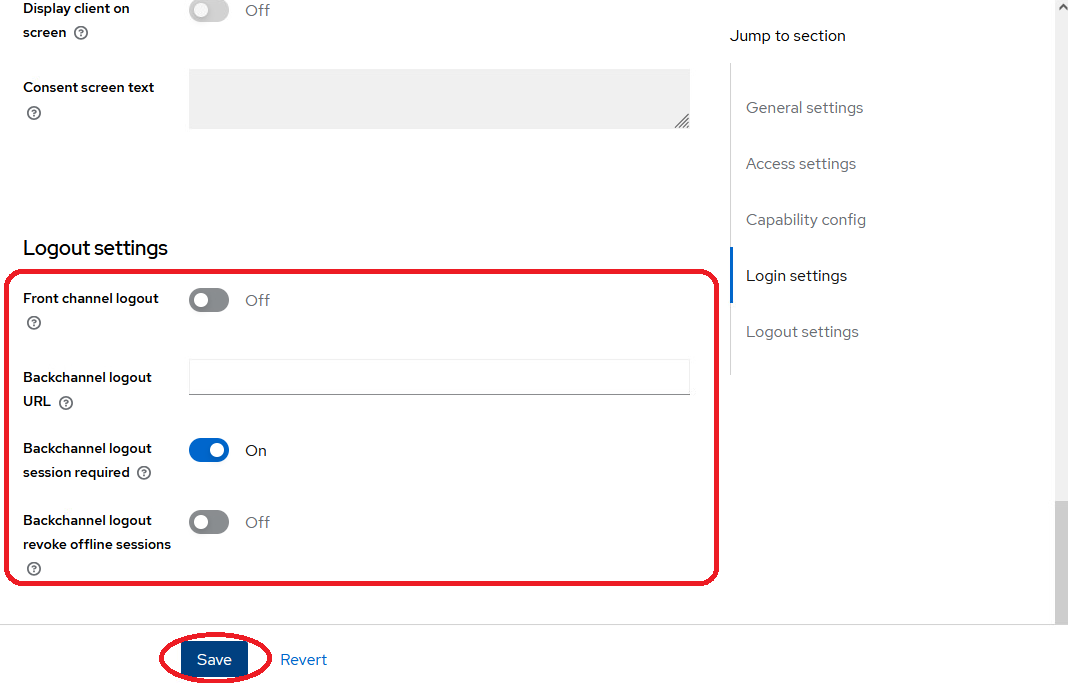
-
Save the settings.
PLOSSYS Administrator Client
-
Select the
Clientsmenu on the left and clickCreate client. -
In the dialog, enter the
General settings.General Settings Client Type OpenID Connect Client ID seal-plossysadmin Name PLOSSYS Administrator Description Angular UI client for PLOSSYS Output Engine Always display in UI OFF -
Click
Next. -
In the dialog, enter the
Capability configsettings.Capability config Client authentication ON Authorization OFF Authentication flow: ✔ Standard flow -
Click
Next. -
In the dialog, enter the
Access settings.Access Settings Root URL --- Home URL --- Valid redirect URIs https://localhost:9000/* http://localhost:4200/* https://localhost:4200/* Valid post logout redirect URIs --- Web Origins https://localhost:4200/* https://localhost:9000/* http://localhost:4200/* -
Click
Save. -
In the dialog, check the settings, and enter the
Login settingsin the corresponding section of the list.Login Settings Login Theme --- Consent Required OFF Display client on screen OFF Consent screen text --- -
Enter the
Logout settingsat the bottom of the list.Logout Settings Front channel logout OFF Backchannel logout URL --- Backchannel logout session required ON Backchannel logout revoke offline sessions OFF -
Save the settings.
PLOSSYS CLI Client
-
Select the
Clientsmenu on the left and clickCreate client. -
In the dialog, enter the
General settings.General Settings Client Type OpenID Connect Client ID seal-plossyscli Name PLOSSYS CLI Description User command line interface for PLOSSYS Output Engine Always display in UI OFF -
Click
Next. -
In the dialog, enter the
Capability configsettings.Capability config Client authentication ON Authorization OFF Authentication flow: ✔ Standard flow ✔ Direct access grants -
Click
Next. -
In the dialog, enter the
Access settings.Access Settings Root URL --- Home URL --- Valid redirect URIs https://localhost:1234/* Valid post logout redirect URIs --- Web Origins --- -
Click
Save. -
In the dialog, check the settings, and enter the
Login settingsin the corresponding section of the list.Login Settings Login Theme --- Consent Required OFF Display client on screen OFF Consent screen text --- -
Enter the
Logout settingsat the bottom of the list.Logout Settings Front channel logout OFF Backchannel logout URL --- Backchannel logout session required ON Backchannel logout revoke offline sessions OFF -
Save the settings.
PLOSSYS DocPrint Client
-
Select the
Clientsmenu on the left and clickCreate client. -
In the dialog, enter the
General settings.General Settings Client Type OpenID Connect Client ID seal-mobile-print Name PLOSSYS DocPrint Description Client for PLOSSYS DocPrint Always display in UI OFF -
Click
Next. -
In the dialog, enter the
Capability configsettings.Capability config Client authentication ON Authorization OFF Authentication flow: ✔ Standard flow ✔ Direct access grants -
Click
Next. -
In the dialog, enter the
Access settings.Access Settings Root URL --- Home URL --- Valid redirect URIs https://localhost:8090/* Valid post logout redirect URIs --- Web Origins --- -
Click
Save. -
In the dialog, check the settings, and enter the
Login settingsin the corresponding section of the list.Login Settings Login Theme --- Consent Required OFF Display client on screen OFF Consent screen text --- -
Enter the
Logout settingsat the bottom of the list.Logout Settings Front channel logout OFF Backchannel logout URL --- Backchannel logout session required ON Backchannel logout revoke offline sessions OFF -
Save the settings.
PLOSSYS Infoclient Client
-
Select the
Clientsmenu on the left and clickCreate client. -
In the dialog, enter the
General settings.General Settings Client Type OpenID Connect Client ID seal-infoclient Name PLOSSYS Infoclient Description PLOSSYS Infoclient for {{ PLOSSYS_4 }} and PLOSSYS Output Engine Always display in UI OFF -
Click
Next. -
In the dialog, enter the
Capability configsettings.Capability config Client authentication ON Authorization OFF Authentication flow: ✔ Service accounts roles -
Click
Next. -
In the dialog, enter the
Access settings.Access Settings Root URL --- Home URL --- Admin URL --- -
Click
Save. -
In the dialog, check the settings, and enter the
Login settingsin the corresponding section of the list.Login Settings Login Theme --- Consent Required OFF Display client on screen OFF Consent screen text --- -
Enter the
Logout settingsat the bottom of the list.Logout Settings Front channel logout OFF Backchannel logout URL --- Backchannel logout session required ON Backchannel logout revoke offline sessions OFF -
Save the settings.
SEAL OP-CLI Client
-
Select the
Clientsmenu on the left and clickCreate client. -
In the dialog, enter the
General settings.General Settings Client Type OpenID Connect Client ID seal-opcli Name SEAL OP-CLI Description User command line interface for SEAL Operator Always display in UI OFF -
Click
Next. -
In the dialog, enter the
Capability configsettings.Capability config Client authentication ON Authorization OFF Authentication flow: ✔ Standard flow ✔ Direct access grants -
Click
Next. -
In the dialog, enter the
Access settings.Access Settings Root URL --- Home URL --- Valid redirect URIs https://localhost:1234/* Valid post logout redirect URIs --- Web Origins --- -
Click
Save. -
In the dialog, check the settings, and enter the
Login settingsin the corresponding section of the list.Login Settings Login Theme --- Consent Required OFF Display client on screen OFF Consent screen text --- -
Enter the
Logout settingsat the bottom of the list.Logout Settings Front channel logout OFF Backchannel logout URL --- Backchannel logout session required ON Backchannel logout revoke offline sessions OFF -
Save the settings.
SEAL Operator Client
-
Select the
Clientsmenu on the left and clickCreate client. -
In the dialog, enter the
General settings.General Settings Client Type OpenID Connect Client ID seal-print-client Name SEAL Operator Description Angular UI client for SEAL Operator Always display in UI OFF -
Click
Next. -
In the dialog, enter the
Capability configsettings.Capability config Client authentication ON Authorization OFF Authentication flow: ✔ Standard flow ✔ Direct access grants -
Click
Next. -
In the dialog, enter the
Access settings.Access Settings Root URL --- Home URL --- Valid redirect URIs https://localhost:3000/* Valid post logout redirect URIs --- Web Origins https://localhost:3000 -
Click
Save. -
In the dialog, check the settings, and enter the
Login settingsin the corresponding section of the list.Login Settings Login Theme --- Consent Required OFF Display client on screen OFF Consent screen text --- -
Enter the
Logout settingsat the bottom of the list.Logout Settings Front channel logout OFF Backchannel logout URL --- Backchannel logout session required ON Backchannel logout revoke offline sessions OFF -
Save the settings.
Web Portal Client
-
Select the
Clientsmenu on the left and clickCreate client. -
In the dialog, enter the
General settings.General Settings Client Type OpenID Connect Client ID seal-webportal Name Web Portal Description Web Portal client for internal communication Always display in UI OFF -
Click
Next. -
In the dialog, enter the
Capability configsettings.Capability config Client authentication ON Authorization OFF Authentication flow: ✔ Service accounts roles -
Click
Next. -
In the dialog, enter the
Access settings.Access Settings Root URL --- Home URL --- Admin URL --- -
Click
Save. -
In the dialog, check the settings, and enter the
Login settingsin the corresponding section of the list.Login Settings Login Theme --- Consent Required OFF Display client on screen OFF Consent screen text --- -
Enter the
Logout settingsat the bottom of the list.Logout Settings Front channel logout OFF Backchannel logout URL --- Backchannel logout session required ON Backchannel logout revoke offline sessions OFF -
Save the settings.
Configuring SEAL Clients
Usually you do this part of the configuration by environment variables on the client side.
You need the following data to set up SEAL Operator and PLOSSYS Output Engine clients:
-
issuer url
-
issuer name
-
all client id's
-
all client secrets
You will find an example in Configuring Other Identity Providers.